• HOME
  • PORTFOLIO
  • BIO
  • MAKEUP MEETS TECH
  • CONNECT
  • HOME
  • PORTFOLIO
  • BIO
  • MAKEUP MEETS TECH
  • CONNECT

Tag: techtools

MAKEUP, TECHNIQUE |

February 26, 2016

| by Sara Domi

MAKEUP MARBLING

makeup art

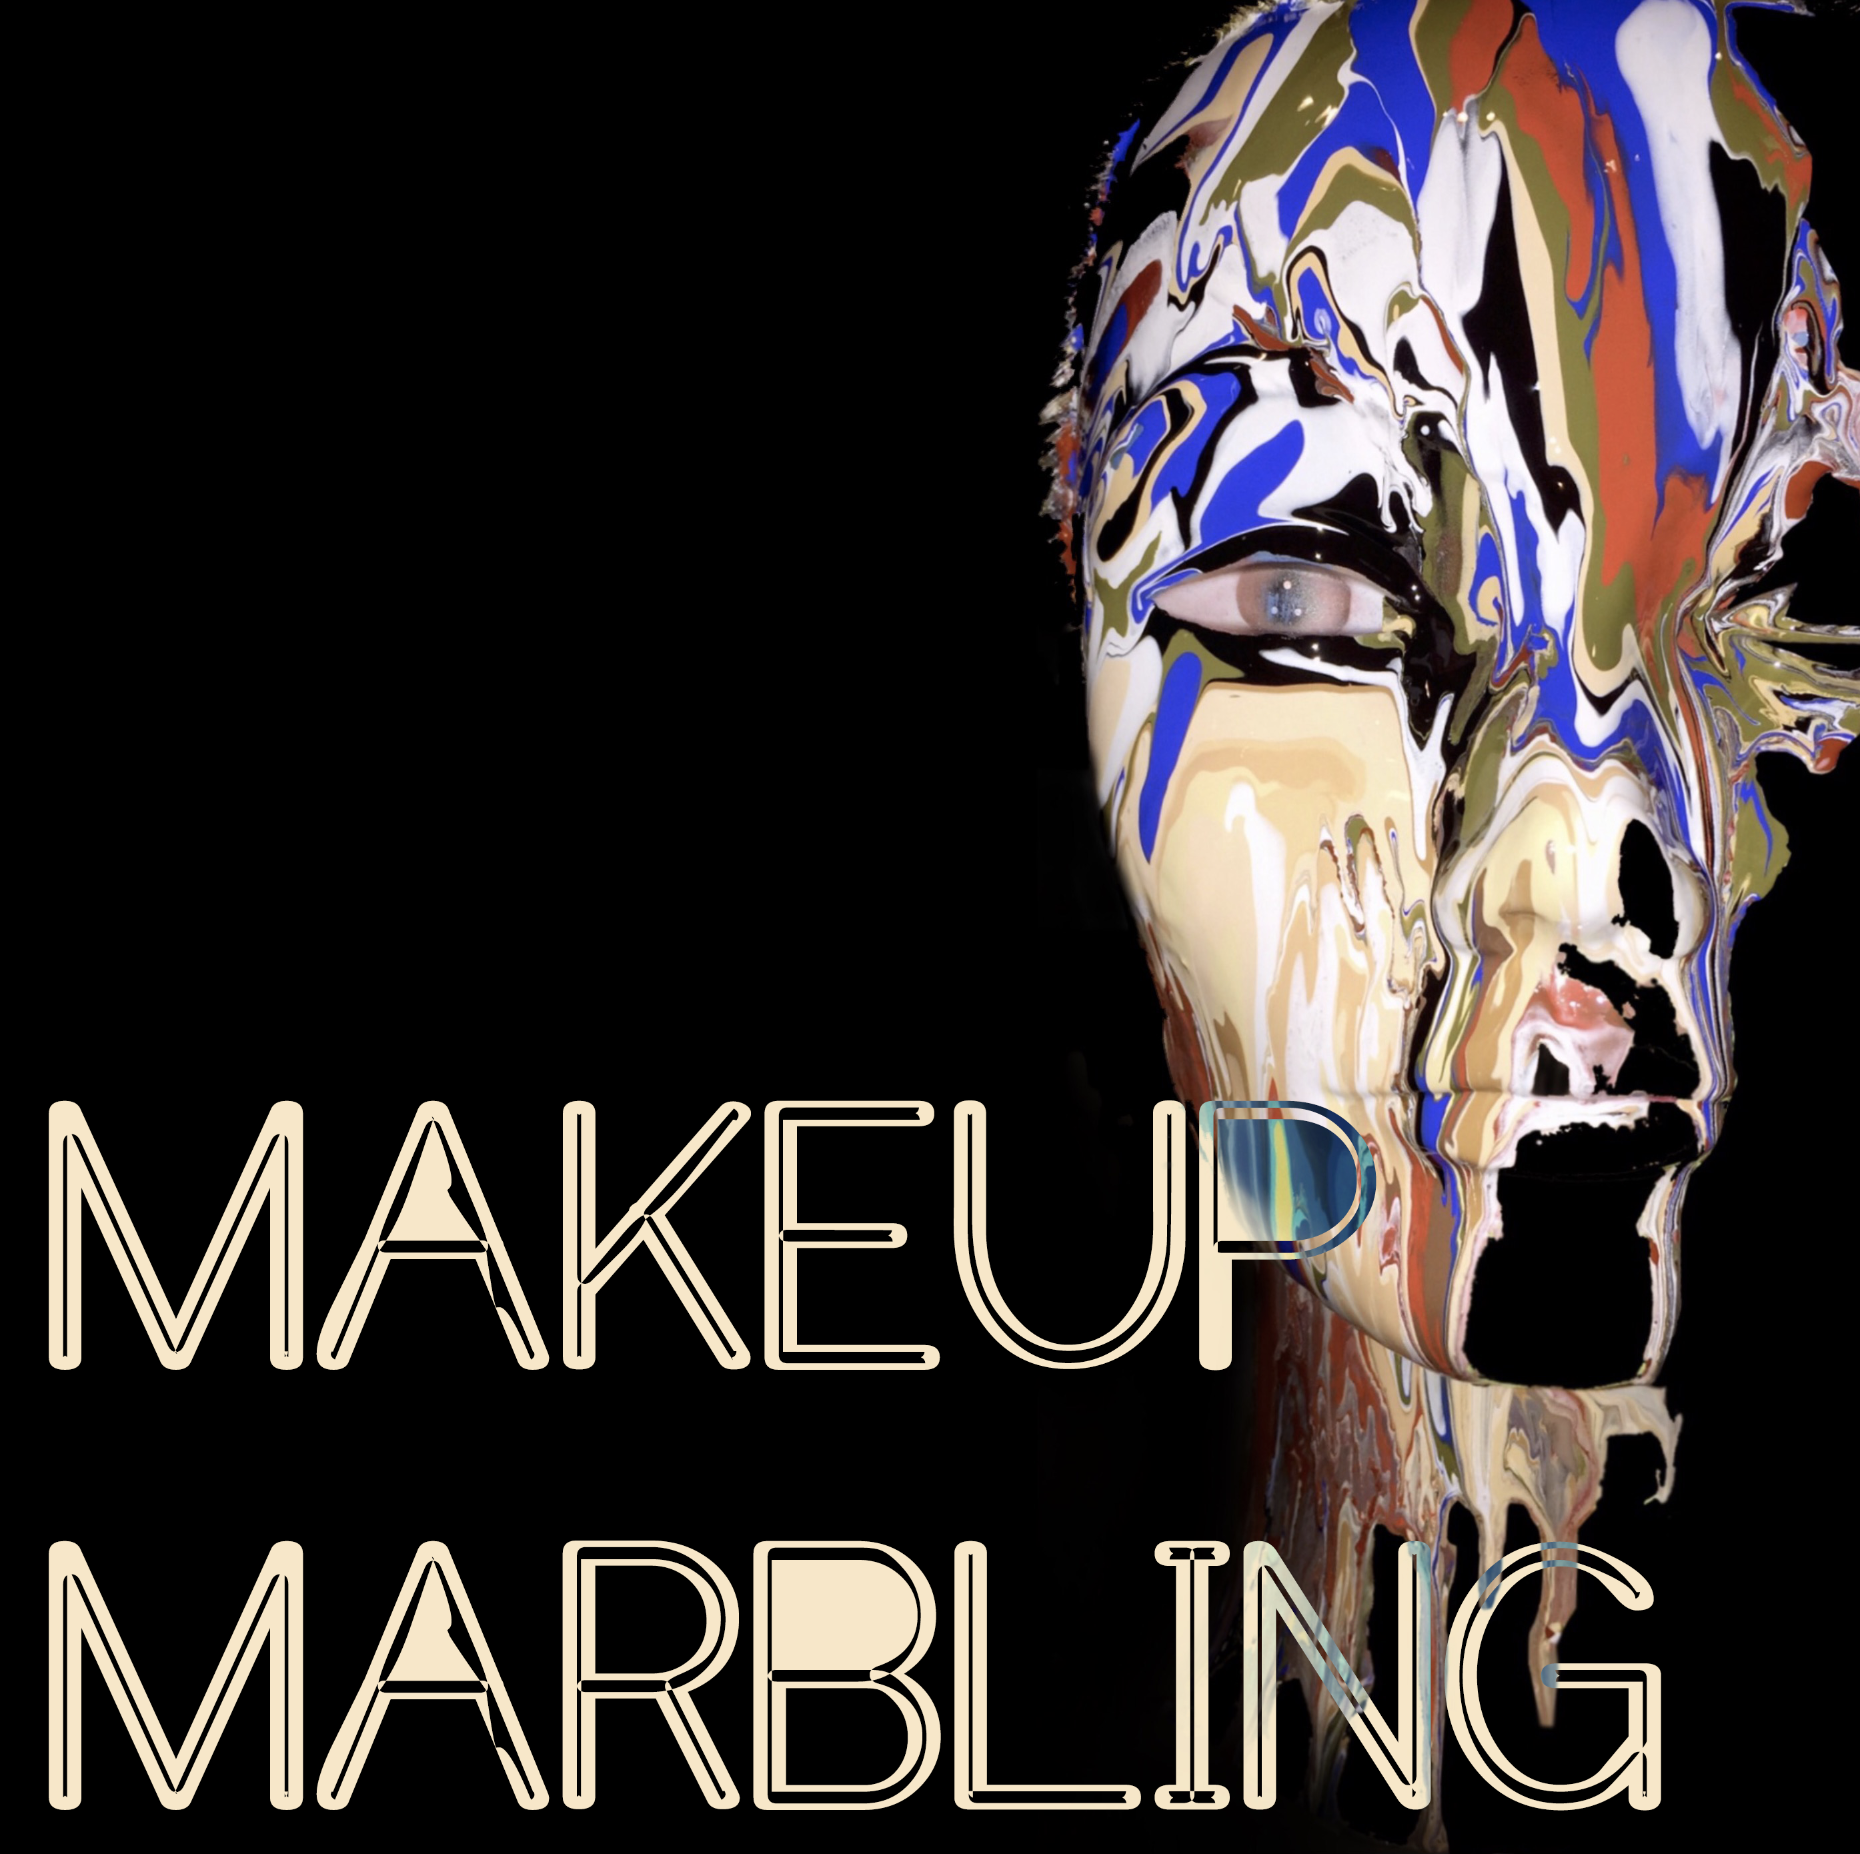
Meet my mannequin … Her name is Viola, LOL. When trying new techniques I practice on Viola prior to attempting my ideas on a real face.  This step helps me work out all the kinks and nail down my placement and color balance.  I’ve posted a couple pics on social of my first attempt at makeup marbling.  I have been brainstorming an idea to create an effect that I have yet to see done on the face realistically.  I will reveal that technique and concept once I figure it out.  I think if I am to successfully execute the technique I hope to get it published…. I’ll keep you guys in the loop for sure.  During my process… I always stumble upon many things and this experiment in particular was one of my happy mistakes.

I’m constantly looking to upgrade my body of work and get new images in my book. After this experiment, I realized that this technique could be book worthy and publishable too.  I decided to shoot a beauty story using this technique while in LA recently.  Though I can’t reveal my final images as of yet; here’s a couple images of my process.

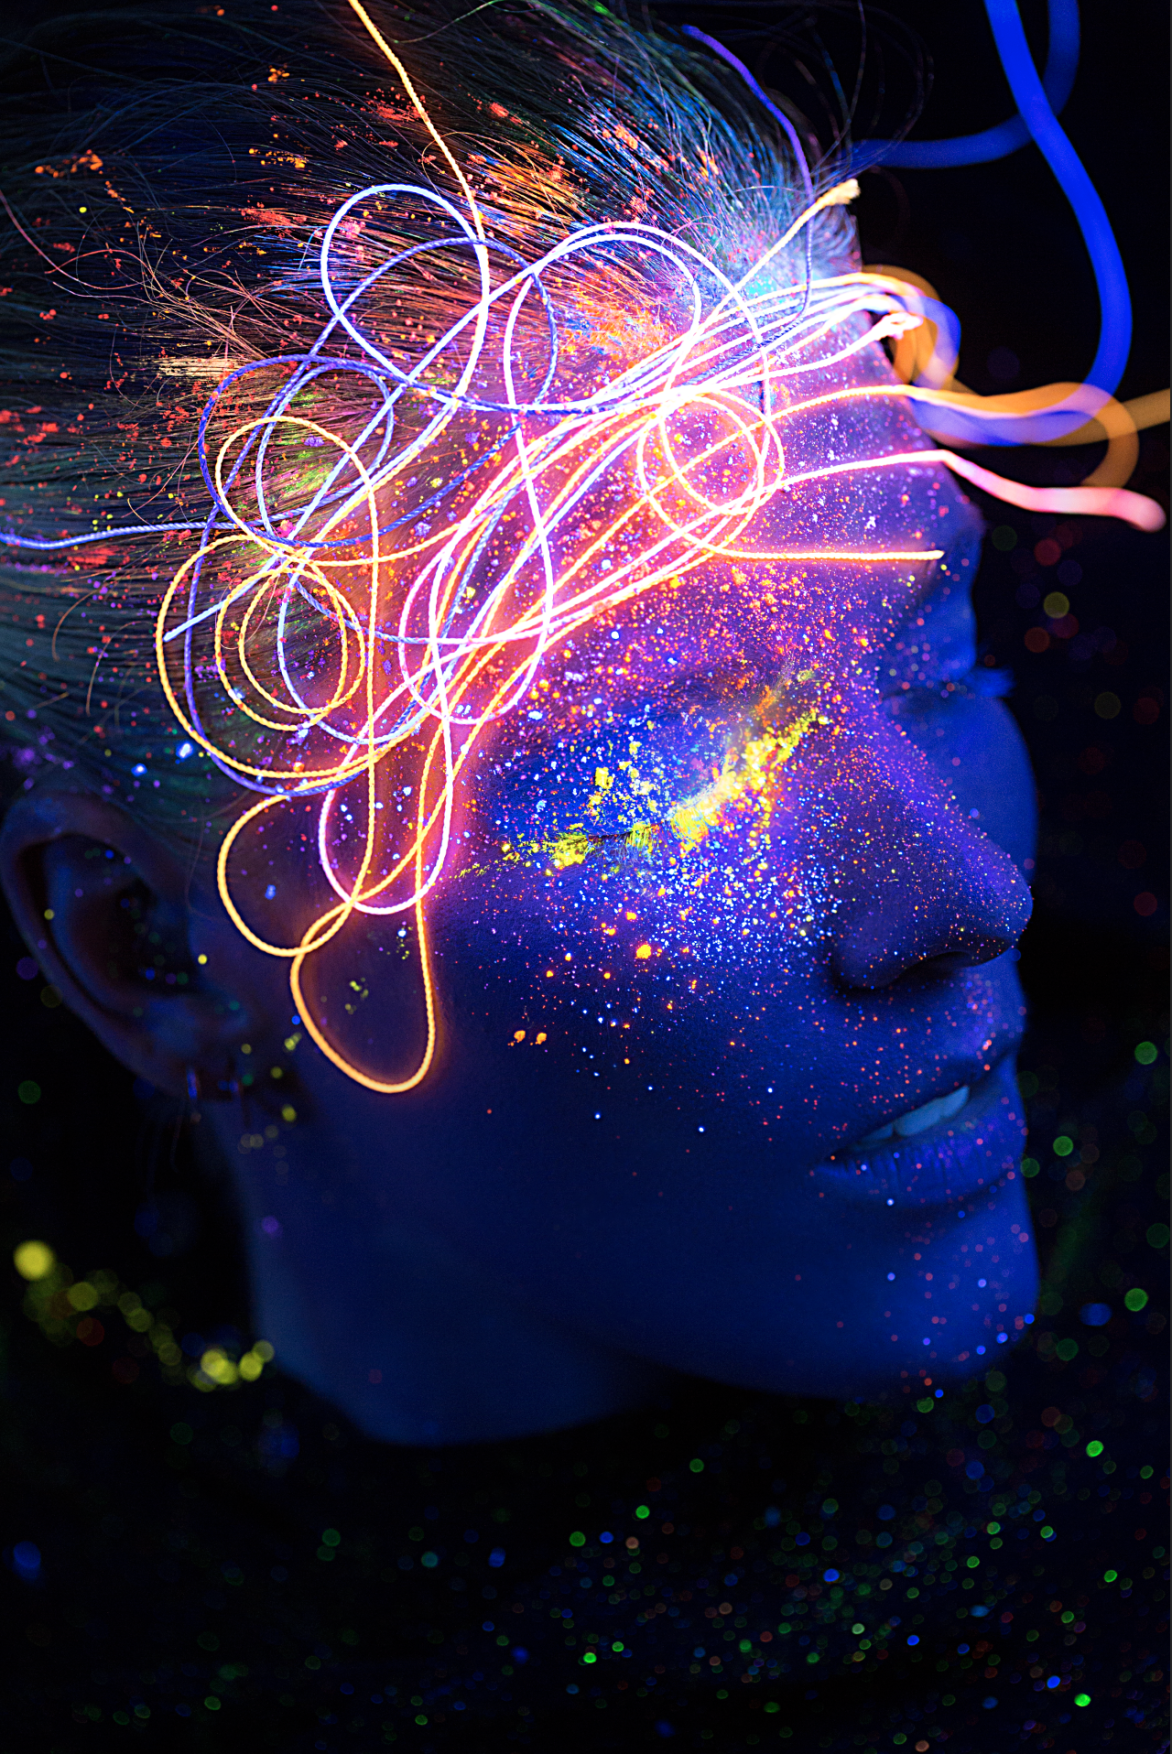
I find YouTube very useful when learning new techniques.  I rarely watch beauty tutorials, however, tutorials on painting and drawing are my jam.  This technique is called liquid painting and is typically used on canvas.  The technique involves dropping liquid paint in various shades to the same location multiple times and allowing gravity to do its thing.  The skin is much different than a canvas with its peaks and valleys.  Gravity doesn’t behave the same on a face, as it does on a flat surface, obviously.

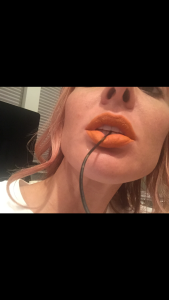
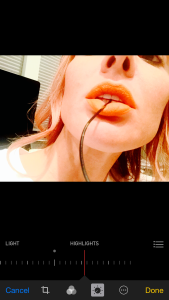
I began at the top of the forehead in the upper right recession.  Black liquid airbrush makeup was dropped onto the face first and was followed with multiple shades and repeated over and over again.  The more color you add; the more the paint travels creating the marbled effect.  makeup

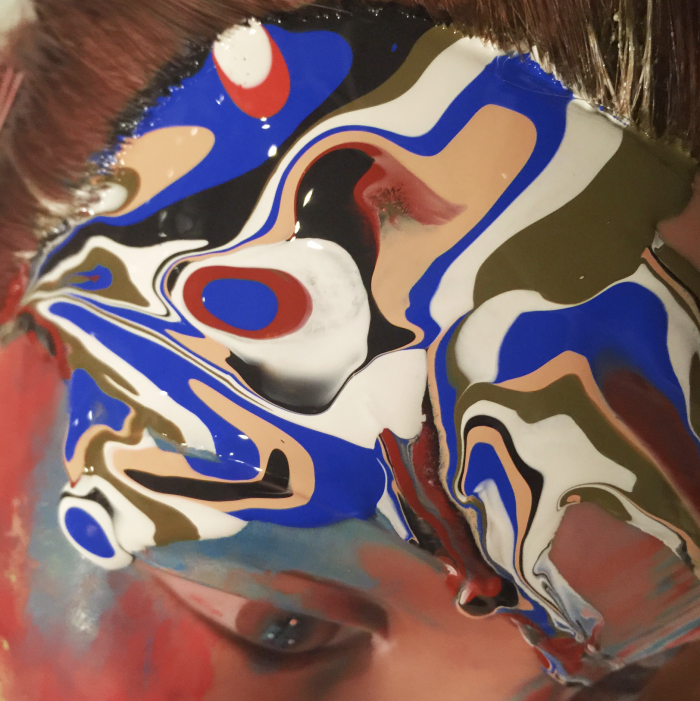
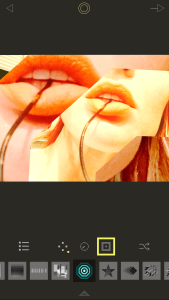
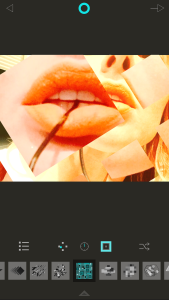
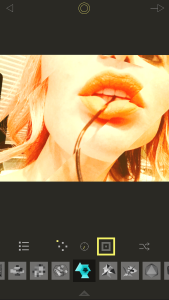
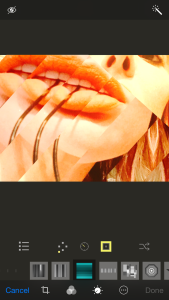
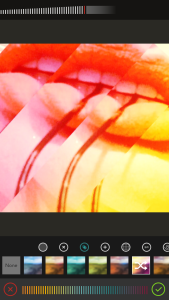
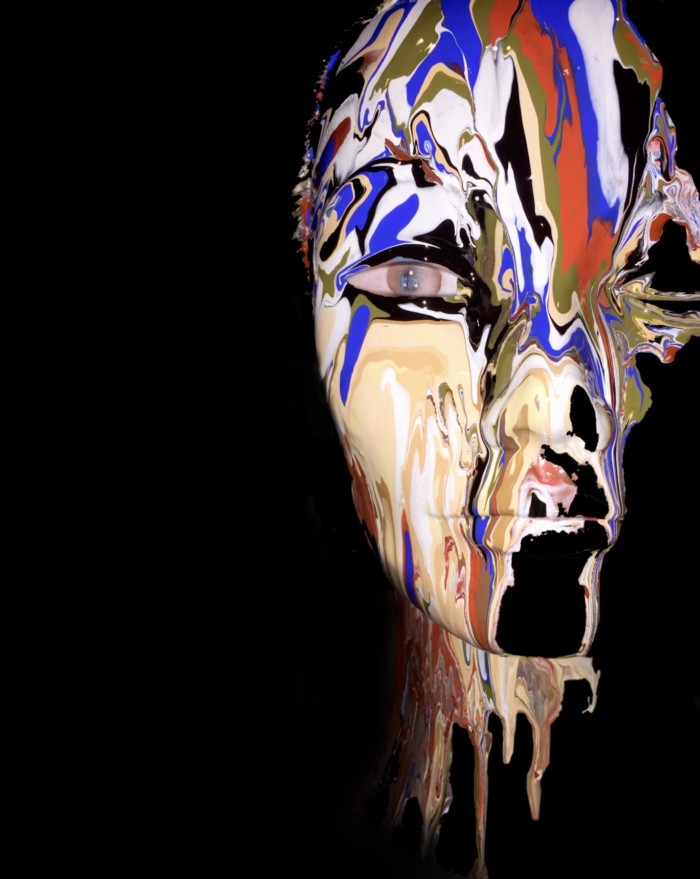
During this process I learned that my model must be lying down to have more control over the result.  I moved my mannequin’s head from side to side to allow for the paint to move in the direction I wanted my end result to reside.  This first snap is a close up of the marbled effect.  Viola, as you can see, still had prior experiments on her face and the skin peeking through made me realize that the marbled effect would be much stronger if it didn’t compete with my model’s skin tone.  Many of my concepts start with a physical application followed by fine tuning in Photoshop to aid me in visualizing placement and details.  This concept was no different.  This next image I dragged into Photoshop and selected everything but the marbled effect and her eye.  I filled it with black and really liked the way it read.  The marbling jumped off the screen when the skin tone was absent and her eye popped.  

makeup

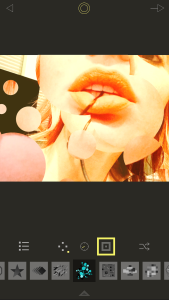
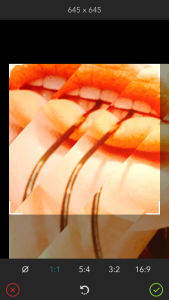
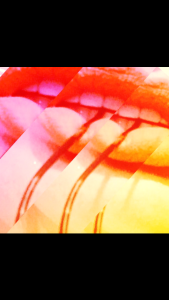
This last image is the entire face with the Photoshop treatment applied.  I found that going through this process gave me an understanding that I needed to paint my model’s face black prior to applying the marbled effect.  I also needed to use a black makeup that would not transfer to the liquid marbling and muddy the effect.  Once the marbling is applied, I learned that you can’t touch it.  The paint looks best when you allow the liquid to take shape on its own.  “Let the makeup take shape and NOT touch it?”… a challenge indeed.  Another notable find was that the technique reads best sooner than later.  The longer the makeup spread, the more the paint mixed together and lost its shape.  So be quick if you try this one and have your camera ready to shoot the process.

makeup artist

PRODUCTS:

MAKEUP MARBLING EFFECT – Numerous shades of MUD Cosmetics HD Air

I invite you to SUBSCRIBE to MAKEUP MEETS TECH for posts that are all things tech.  As always… I truly appreciate the likes, pins, shares and tweets.  Join me on social for daily posts.  For a makeup related tech post… check out Graphic MAKEUP Just Got Easier for a breakdown on how to use a die cut machine to create custom makeup appliances.  I encourage comments and questions… we are all here to learn.

art, artist, atx, austin, editorial, editorial makeup, fashion, LA, London, make art now, makeup, makeup art, makeup artist, makeup tutorial, MakeupBySaraDomi, mastered, masteredwithval, NYC, runway, sara domi, sara says so, tech tools, techtools, tutorial, val garland, val garland school of makeup | 1 Comment

Blacklight MAKEUP

Posted in MAKEUP, TECHNIQUE |

December 16, 2015

| by Sara Domi | 4 Comments
makeup by sara domi

I just shot a new beauty editorial using a blacklight.  I want to take you through my process on how I conceptualized this story and the techniques and challenges I experienced while working with blacklight makeup. My blacklight makeup series has three looks, however, working with a new photographer friend named Jessica Pages, enabled us to shoot the progression of the looks.  She kept shooting and I kept adding paint till we agreed that we had gotten the shot.  My lovely model Gabrielle Cristyne, drove down from Dallas to come play with us.  I couldn’t be happier with the results.  Here’s how I got there…

Read More →

armani cosmeticsartartistatxaustinblack lightblack light makeupblacklightblacklight makeupdie cutdie cut makeupeditorialeditorial makeupeye arteye makeupeyesfashiongiorgio armanigraphic makeupkryolanLAlip artlip shotlipsLondonmac cosmeticsmake art nowmakeupmakeup artmakeup artistmakeup forevermakeup forever cosmeticsmakeup tutorialMakeupBySaraDomimasteredmasteredwithvalmehronmoon glowmufenarsNYCpaintsara says sosplatterstencilstippletech toolstechtoolstutorialuv makeupval garlandval garland school of makeupvivienne westwood

Post BETTER Photos NOW

Posted in TECHNIQUE |

November 23, 2015

| by Sara Domi | 2 Comments
post better photos

Have you ever thought…. I wish I knew how to post better photos?  Though I feel really comfortable using PHOTOSHOP; a few apps have made their way into my staple tech tools.  Last week I ran into a challenge and I thought I would share it with you.  I keyed the makeup team for DIFFA DALLAS‘ ad campaign.  This campaign is a yearly shoot to promote DIFFA’s fashion show extravaganza.  I am not exaggerating…. this show is like nothing you have ever seen.  It is truly a spectacle.

DIFFA is an organization that benefits the local community of those living with or effected by HIV and AIDS.  How I view the HOUSE OF DIFFA… it is an organization that enables artists like me, to have creative freedom for a cause.  I love working with DIFFA because I get to play, and nothing can be too over-the-top.  This campaign is very secretive and it is understood that DIFFA should be the first to release any images to the public.  That’s when my challenge arrived.  I was so excited about the amazing makeup that my team and I created… how could I post images and not give anything away?  For the artists reading this… I know you have experienced this.  You want to post, but you can’t. For the those of you who aren’t artists… I’m going to show you how to use apps to truly create works of art from a selfie; all done from your smart phone.  Let’s begin.

Sitting in my hotel room in Dallas, I started playing with the quick snaps I took on set and in the makeup prep area.  These three images are the images I posted to social media.  All three images were taken with my iPhone and edited completely on my phone using apps.  Links to all apps are under TECH TOOLS at the bottom of the post.


Here’s where the fun begins.  You will rarely see me take a selfie, but for the purposes of education I want to show you that even a poorly lit selfie has the potential to be an amazing post.

iPhoto

iPHOTO

The next set of images will take you through the simply alterations you can do with your installed photo app.  I have an iPhone so these edits are made with iPhoto.  You start with a photo.  You can see how bad the lighting is.  I like the Chrome or Transfer filter.  I chose Chrome this time.  I bumped the exposure, the black point and highlights.

post better photos


fragment

FRAGMENT

After saving the last frame, I open FRAGMENT.  I upload my saved image and use the various controls to find my desired fragmented edit.  TECH TIP… the circle at the top middle of the screen will bounce between editing the image versus the fragment.  If you don’t like the style of the fragment, click the two intersecting arrows on the right to get a new style.  I have noticed that uploading un-cropped images work best in this app.  FRAGMENT takes a little practice, but once you get the hang of it… so worth it.  The next series of images are variations I went through before finding the fragment I liked best.  Save your work to your camera roll and you’re ready to move on.

post better photos


shift

SHIFT

SHIFT is really great for altering color, creating inversions and adding style to your photos.  I chose this app for my image because I noticed that the lipstick I’m wearing in my selfie is really close in tone to everything else in the photo.  I felt it need a little color alteration to add interest.  When you open your saved image in the SHIFT app you will see the option to crop your image.  I know that I will be posting my photo to INSTAGRAM, so much of the time I will opt for a 1:1 ratio…. which means “square”.  SHIFT’s preset filters can be really easy, but for this image, I tapped the color feature located at the middle, bottom of the screen.  I opted for the filter named “Antigua”.  The filters are the colored boxes.  The circles above the colored boxes use a similar language to Photoshop.  You can alter the effect of the filter with these circles.  I chose “Overlay”.  The scale at the bottom alters hue and the scale at the top alters intensity.  TECH TIP…. tap the intersecting arrows on your color filter to change the position of your colors.  This app is cumulative, so I find that one selection looks better than layers of filters.  Click “DONE” and the image will save to your camera roll.

post better photos


font candyFONT CANDY

Many of you may stop there, but for education purposes I want to share with you an app I just found.  FONT CANDY is used if you want to add words to your images.  You can simply use one font or add multiple fonts to your photo.  I opened my saved photo into FONT CANDY to add the final touches.  I used three different fonts making it necessary to use three font boxes.  Each text box has many options including font, size, character spacing, text curve, etc.  Once you have your text the size and orientation you LOVE, click the circle at the top of the screen to alter the text color and mask color.  I opted to make the mask color black and decrease the opacity to reveal my final effect.  Click the save button in the top right hand corner of the app to save to your camera roll or post directly to INSTAGRAM or FACEBOOK.


post better photos
post better photos
post better photos

I love what is possible with technology!!  I have the pleasure of working with some amazing artists on a daily basis.  I always hear the same thing… “but I don’t have anything to post”.  Never again will you have the excuse that you don’t have a photo to post if you use even a couple techniques I showed you today.  Personally, I HAVE to make art… whether I do that on a face or on a screen.  Sometimes you’ll find my blog to talk about makeup technique; but how I present that technique is just as important as doing a perfect eyeliner.  Here is my final image and I invite you to play with apps to post better photos.

post better photos


PRODUCTS:  LIME CRIME Velvetines in Squash

TECH TOOLS:  iPHOTO, FRAGMENT, SHIFT, FONT CANDY

I invite you to SUBSCRIBE to MAKEUP MEETS TECH for posts that are all things tech.  As always… I truly appreciate the likes, pins, shares and tweets.  Join me on social for daily posts.  For a makeup related tech post… check out Skull MAKEUP Tutorial.  I encourage comments and questions… we are all here to learn.

apps make artartartistatxaustindesigndie cut makeupeditorialeditorial makeupfashionfont candyfragmentgraphic designgraphic makeupiphoneiphotomake art nowmakeupmakeup artmakeup artistMakeupBySaraDomimasteredmasteredwithvalsara says soshifttech toolstechtoolsval garland school of makeup

SUBSCRIBE

My name is Sara Domi and I invite you to subscribe to my beauty blog... MAKEUP MEETS TECH. Your information will never be shared or sold. I hold my subscribers in the highest regard.
makeup by sara domi

Recent Posts

  • Cheap website hosting plans
  • Talisa Duran – Shoot For Cosmetic Line
  • GLITTER in MOTION for OOBEAUTY
  • NO NAME MAGAZINE – SARA DOMI
  • OOB MAGAZINE – Kiersey Clemons – Part 2
[fts_instagram instagram_id=223113536 pics_count=4 super_gallery=yes image_size=250px icon_size=65px space_between_photos=1px hide_date_likes_comments=no center_container=yes image_stack_animation=yes type=user popup=yes loadmore=autoscroll height=1000px]
[fts_twitter twitter_name=saradomi_makeup twitter_height=auto tweets_count=5 popup=yes]
[fts_facebook id=974197352620331 posts_displayed=page_only posts=3 title=yes description=yes words=25 type=page grid=yes space_between_posts=10px colmn_width=310px hide_like_option=no]

SUBSCRIBE

My name is Sara Domi and I invite you to subscribe to my beauty blog... MAKEUP MEETS TECH. Your information will never be shared or sold. I hold my subscribers in the highest regard.
makeup by sara domi

[fts_instagram instagram_id=223113536 pics_count=4 super_gallery=yes image_size=250px icon_size=65px space_between_photos=1px hide_date_likes_comments=no center_container=yes image_stack_animation=yes type=user popup=yes loadmore=autoscroll height=250px]
[fts_twitter twitter_name=saradomi_makeup twitter_height=auto tweets_count=5 popup=yes]
[fts_facebook id=974197352620331 posts_displayed=page_only posts=3 title=yes description=yes words=25 type=page grid=yes space_between_posts=10px colmn_width=310px hide_like_option=no]

SaraDomi.com ©2016. All Rights Reserved.

All Rights Reserved.